Thursday, May 26, 2016

Summer Horsemanship Series

Hello Everyone. Here is the info for the Summer Horsemanship Series happening in June
If you have any questions please feel free to call 406-285-1754 or email info@turnerhorsemanship.com


Tuesday, May 24, 2016

GRR Poker Ride on "50 Shades of Grey" - May 2016


2016 Gallatin River Ranch Poker Ride, riding "50 Shades of Grey" a young Tennessee Walking Horse mare that I have had the pleasure of starting this Spring. Here she is with about 30 days on her and her first major trail ride off the ranch. It was very wet and very rainy but we had a great ride none the less.


First time in the 2 Horse Trailer was the day before.


Smooth as butter coming out just asking for her to back by lifting her tail.


A little break looking into one of the many valleys along this 10k ride.


I ended up with a pair of 6's for my hand so I didn't even come close to winning but the real winner was "50 Shades of Grey"! 

She had an awesome trail ride and except for about the first mile "50" was willing to give it her 100% in effort. She did great with other horses coming and going, being able to work off leg pressure and also rein pressure. Working and Free Walk & Jog are really shaping up and her canter is very nice as her gait as just so dreamy. Things we worked on quite a bit was not running down hills (which is very common in young horses) and maintaining gait when increasing to faster speeds of gait (instead of breaking into a trot or pace).

I am very much looking forward to redemption in the next Poker Rider, come on 4 Aces!

Until then Be Safe & Have Fun!

Joe Turner

Sunday, May 22, 2016

Halter Correct

This article is an explanation on how to fit and tie a rope halter properly to your horse. I want to explain the “how and why” we tie rope halters properly on our horses, we do this to provide proper function and to create the absence of pain and the absence of dangerous situations. Along with this article are some images that are included to show the proper placement of a rope halter and the proper way to tie your halter, also included is an image of a mis-tied halter also showing improper placement. In addition are included some images of the horse’s skull and facial nerves to help provide visual information on anatomy of horse’s head.

The rope halters that I like to use are made from a medium weight, semi-firm in stiffness material so they do not move around on the horse’s face and provide immediate contact in all the correct places on the head to be able to control horse with minimal but effective pressure to the facial nerves. The halter rope should not be too thick or to thin (around 7mm-8mm), thin halters can provide pain, rope burn and too much pressure on the facial nerves and loose halters are sloppy and don’t stay in place on the head which provides inconsistent techniques where as too thick of rope will not provide adequate pressure and have the same effectiveness as a web halter.

The two most common mistakes that I see are 1.) the proper way of tying the halter to the horse and 2.) the correct placement of the rope halter on horse’s head. Below, in image #1 you can see the proper tying and position of the halter on the horse’s head, image #2 is an example of an incorrect fitting halter, image #3 is of the facial nerves of the horse and image #4 is of a horse’s skull showing the bones and structure of the head.
                       
Good Fit – Nose band is high on the bridge        Bad Fit- Nose band sits low on the 
of the nose, Throatlatch is behind the jaw,          face, no contact with facial nerves 
and head piece is just behind the Poll.                and Throatlatch is across cheeks and 
                                                                                      jaw, head piece is correctly placed. 


This image shows where the facial nerves lie under the skin and show
the proper lines of pressure and knot placement of halter.

This photo of the horse’s skull shows how thin and fragile the Nasal Bone
is and how sharp the edge of the jaw bone (Mandible) is. From this picture
you can see how the edge of this sharp bone can cause pain when pulling
on a halter that crosses the cheek and jaw-line and how a low-fitting halter can possibly injure the nose of the horse.

These next set of photos show the progressive steps to properly tie the halter on the horse.
1.
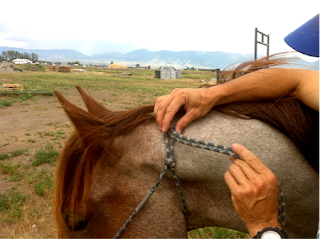
Pull Loose end of the Halter through the eyelet like in picture bringing the remaining end towards the rear of the horse.
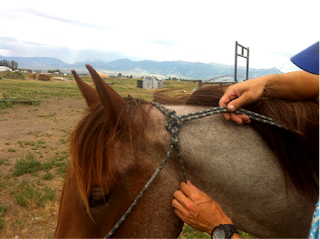
2.
Pass end behind and under eyelet and thus creating a loop with the slack. It is important to note that this loop is made under the top bridge of the eyelet and not above which would then not allow the knot to come untied once weighted.
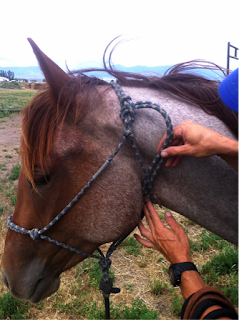
3.
Pass end of rope through the newly created loop and pull tight.
4.
Make sure that the halter rope is not twisted and the halter is snug and correctly fitting with noseband and throatlatch.


5.
Noseband should sit just above the halfway point between the eyes and end of the nose. Throatlatch knot should be placed at the junction of the neck and head while the sides of the Throatlatch should sit snugly behind the jaw line. Tuck loose end into the halter behind the jaw and Happy Trails!


6.
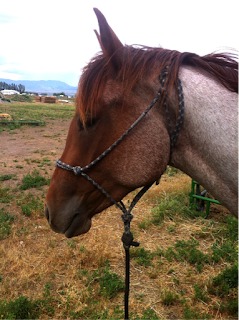
A correctly tied and fitting halter!

Tuesday, May 17, 2016

Spring Rodeo Avoidance Tips

Hello Everyone,

Wow it has been a long time since I have been on this Blog, I almost forgot about it ;-)
Well I am going to try to be a little more diligent with using it so I can kind of stay in touch and keep you all updated on my adventures around the globe with horses and skis and family and such.

Needless to say a ton has happened since my last reported sighting but the thing I am most happy about is that we are expecting the stork to deliver us a little baby boy near the beginning of July. Woohoo a new little skiing and horse riding pardner! I can't wait, this kid has been kicking up a storm while slouching away his days in the womb. He wants out, his brother wants him out, I want him out and Mom well she's getting there and sister will make up her mind when he gets here. As expected we are all super excited! Well now I am just rambling so let me get to the point of why I am writing this piece.

It is Spring and we all want to go get our trusty steeds off the winter pastures and saddle up and ride off into the sunset just like we left off at the end of last summer. Well you just might want to slow your roll and think about a little Spring Cleaning first, not only of the Tack Room but of your horse's mind too. Chances are that while over the winter days of looking for every blade of grass to the plush pastures in bloom right now that riding kind of took a back seat and this human/equine partnership is not quite as cool as the other four legged fly swatters all around them.

Before my first ride of the Spring on a horse, that I may have not touched in a few months, I like to do a little fence work in addition to the rest of my Pre-Ride Safety Check. I also like to do this fence work to colts I am starting and when reeducating horses that may have had a difficult past as well as any other time I feel it may benefit the horse and keep me safe.

Here are some pictures and descriptions of some of the fence work I like to do. This is much easier to do if you have already taught your horse how to step up to the fence and position themselves for you to mount.

Things to note: I have the lead end of my Mecate Rein draped over my left arm so when the horse decides to leave I still have contact. I am never pulling on the reins or making my horse stand still because I want my horse to have every option possible for their comfort. The horse is completely loose and always has the option of leaving without punishment or discomfort. Also remember that timing is everything and the biggest reward is release of pressure or when the feeling of discomfort ceases.


Image #1: I really like to have a nice fence to stand on, this way the horse can see me in the same position as if I was sitting in the saddle and over them as well if the horse decides it needs to move his or her feet quickly to feel safe or more comfortable then they can do so and I am not in risk of getting hurt or falling off. Standing safely on the fence I can reach over and create some commotion on both sides of my horse. I like using my rope  and saddle strings to lightly bounce all over my horse as well as pick up the stirrups on both sides and let them flop around. I also slap the saddle a bit to create a scary noise. If the horse gets scared and squirts off then just re-set your horse along the fence and continue the progress all the while making sure to give lots of praise and reward when your horse gives effort to standing calmly.


Image #2: Create a loop with your Lariat and slide it over the horse's haunches letting the rope rub them all over their hind legs and rear end. It might be a little scary at first but boy you will sure be glad when that brush or the hidden wire in the grass gets ya!


Image #3: It is a good idea to toss a few loops over them as well so they can see something moving over them quickly. You never know what can happen on the trail especially when those low hanging branches decide the path was the best realty.

Image #4: Bringing the rope back into the coil is also great for them to see something coming towards them and to look to you for confidence. Nothing like a scary snake on your ride just to brighten the day :-)


Image #5: Using the fence provides a great opportunity to throw a leg over while still standing on the fence. If horse squirts off then you are still safely standing on the fence. Which is a nice feeling!

Well I hope this gives you all some ideas of how to help create an enjoyable first ride of the spring instead of the neighborhood's first Rodeo. Remember its all about Safety, Safety, Safety and then you can have your fun. Perform your Pre-Ride Safety Check and go ride off into the Wild Wild West on your trusty steed!!

Look for the RMH Summer Horsemanship Series info and dates to be released soon!

Until next time,

Be Safe & Have Fun,

Joe Turner

PC: Klaudia Turner